
|

|
Selling Animals
|
Overview
This window allows you to record a sale for one animal or a batch of animals with same
sale date, haulier, and destination premises. Some drop-down boxes e.g. Group
require setting up via the Setup | Program Settings menu; click the Setup
menu item you require and then press F1 on the keyboard to get more help.
Follow the instructions in the order that they appear.
To record the sale of a single animal, simply bring up the animal's record in the
Animal Details window and change the Status to "Sold". Now click Save.
You will then be prompted to fill in the details to update the Movement Book
(Premises moved to, etc.)
To record the sale of a batch of animals:
- Move your mouse pointer to the left-hand side of the screen and single left-click on the
Data Entry Helper button. The main portion of the screen will change to
show a list of program tasks
Click on the button for recording sales and disposals. The Animal
Sales window now displays (shown below). You can also access this window from
the Data Entry | Sales menu item.
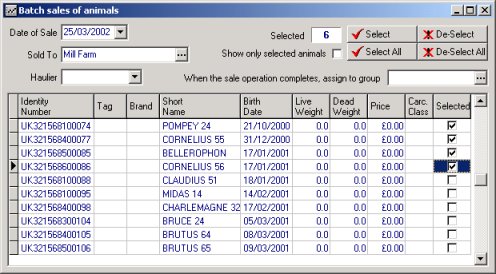
- On the toolbar at the top of the screen, click the Filter Records
button. The Animal Filter Values window will display. This will
allow you to select a sub-set of the animals on farm. Select the management Group
from which you are drawing the animal(s) for sale using the Group drop-down box
and then click OK. The window will close. Also the Filter values window has
a button which will calculate the birth dates of animals nearing 30 months
- In the Animal Sales window click the arrow on the Date of Sale
drop-down box and use the calendar to select the required date (Tip: you can move through
the months using the scroll arrows at the top of the calendar)
- In the same way, select the premises to which the animals have been sold using the Sold
To (Note you will need to have set up some premises via the program setup menu)
- Selecting the Haulier Used from its drop-down box is optional
- For each animal you wish to sell, tick the box in the Selected column in the
relevant line.
- For each animal, you can also optionally enter Live Weight, Dead Weight,
Price and C Class
- You can optionally specify the management group that the animals are assigned to after
sale
- The Selected box at the top of the screen tell you how many animals are
selected. Click the Apply Batch button
 on the Toolbar
- Close the Window. If any of your changes are not saved, the program will prompt
you to save them
 before closing the Window