The Toolbar and Record Searching |
This tutorial aims to introduce you to the program toolbar and how to use the tools for searching animal records. You can jump to the topic of interest by clicking on its underlined link.
Toolbar definitions
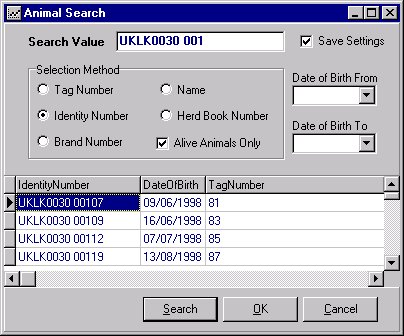
Finding Animals
The program toolbar (shown below) is located at the top of the main program window. The buttons perform functions relating to the window that you are working in. Tip: if you move your mouse pointer over a toolbar button and pause it there, an explanation of the button's function will display.
![]()
| Allows you to find records in the system | |
| Create a new record. This allows you to enter new information about into the program. For example, when you have purchased a new animal, open the Animal Details window and click this button. A new record is created and you can then start entering data. Do this for each new animal | |
| Save record. This saves the information you having been entering or editing. For example, click this button when you have finished entering data for a new animal | |
| Print button. Clicking the print button takes you to a preview of the Report you have selected. When you are happy with the report, you can print from the preview screen. | |
| Undo changes. It restores any information that you have changed in the window to its original state provided that you have not saved the changes that you have made. | |
| This button brings up the previous record in the program. Most Windows will show you all the information that is currently held in the program. Clicking on either the Previous or Next buttons will display different records on the window. | |
| This button brings up the next record in the program. Most windows will show you all the information that is currently held in the program. Clicking on either the Previous or Next buttons will display different records on the Window. | |
| The View Shortcut button. This brings up what is called a short cut menu. Short cut menus will differ from screen to screen and offer a quick means to perform tasks or view other information. A short-cut menu can often be accessed by doing a right-mouse click within a window. | |
| The Filter button | |
| The Grid button | |
| The Apply Batch button. This button is valid when you are using Batch Data Entry windows (bullings, services, sales). When you have made changes to a number of records, the changes are only applied on the computer screen. When you have finished, click the Apply Batch button; this saves all your changes to the batch | |
| The Undo Batch button. When you are working in one of the Batch Data Entry windows (bullings, services, sales) and have made changes to the batch, clicking this button will undo all those changes, provided that you have not clicked the Apply Batch button first |
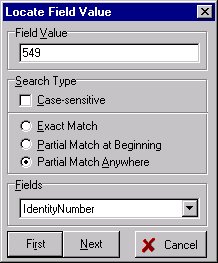
This method of searching can be used in other program windows, for example the Cow Overview window.
|
|