
|

|
Filters, Grids and Short- cut
Menus
|
Overview
This tutorial aims to introduce you to some of the features that will allow you to view
your records in an efficient manner. You will learn the alternative ways of
displaying those records. The topic of short cut menus is also introduced, which
will help you work more efficiently with the program. You can jump to the topic of
interest by clicking on its underlined link.
Using Filters
Using Grids
Shortcut Menus
- When you are working in a program window it is sometimes useful to see only the
animal records that you are interested in. A filter is a program function that will
allow you easily to achieve this. Filters are available in any window where you see
the Filter Records button enabled on the toolbar on the toolbar (Note: if
the button is a grey colour, then the filter is not available for the current window).
- As an example, open the Animal Details window and then click on the Filter
Records
 button. The Animal Filter Values window will
display (shown below)
button. The Animal Filter Values window will
display (shown below)
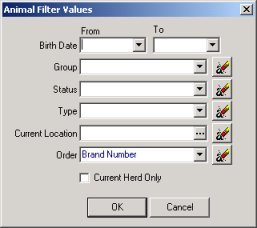
- You can use one or more of the drop-down boxes to define the filter that will be applied
to the animal data. For example, clicking the Status drop-down box
and selecting "Alive" will specify only those animals which are alive and on
farm will be shown; additionally selecting a Type means that only the animals of
that Type will be shown (as well as meeting the Status criterion). The example
filter in the above picture is set up so that only alive calves will be visible in the Animal
Details window (or grid)
- It is important to remember that the filter will persist as long as the selected
filter values remain in the Animal Filter Values window, even when the program is
closed and then re-opened. To set a different filter or view all the
animals in the herd, you must clear the values in the window. To do this click the
erase button
 alongside the relevant
line. If animals cannot be found, it is usually because the filter has been set
incorrectly. Make sure there is nothing in the date boxes and click on the erase buttons
on the right of the data boxes
alongside the relevant
line. If animals cannot be found, it is usually because the filter has been set
incorrectly. Make sure there is nothing in the date boxes and click on the erase buttons
on the right of the data boxes
- Filters are also available for the Batch Data Entry windows and are unique to each type
of window; for example, the filter values for the Service Batch Data Entry window
could be set differently to the Bulling Batch Data Entry.
Return to Top
Viewing Data as a Grid
A grid is an alternative way of viewing and entering/editing data within the
program. It consists of rows and columns. Several program windows can viewed
as a grid. Tip - you can tell when grid view is available when the toggle grid view  button is highlighted on the toolbar.
The following example uses the Animal Details window:
button is highlighted on the toolbar.
The following example uses the Animal Details window:
Single Record View - the details for one animal displays
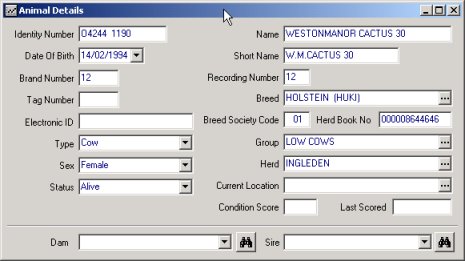
when you toggle to Grid View (below) the animal's details is shown as one row in the
grid (as below):
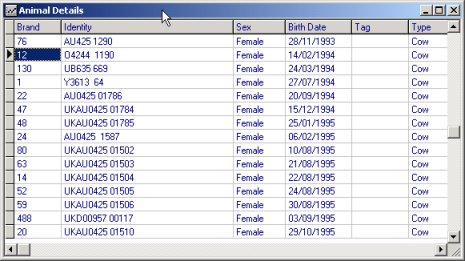
- Open the Animal Details window and click the toggle grid view button on the toolbar. The window will switch to grid view
- In grid view details of all animals, (defined by any filter values) are displayed.
- The columns refer to the data fields, such as Identity Number and Status.
- One row across the grid is known as a record. In the case of the Animal
Details window in grid view, one record relates to one animal
Ordering columns in a Grid
- You can re-order the columns in most grids
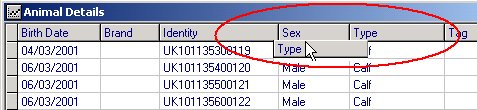
- To re-order columns, place the mouse pointer on the column heading, click and hold down
the left mouse button. Drag the mouse to the left or right and release the button when the
column is in the required position. This is shown in the following screen shot
Once you have the column order that you want, you can save the grid
layout by right-clicking on the grid and moving your mouse pointer to the Grid item and
then click on "Save Layout" from the menu (below)

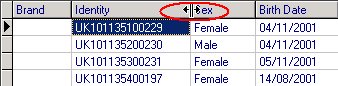
Ordering records (rows) in a Grid
- In the Animal Details grid, you can order the animal records by single clicking on the
column heading that you want to order by. For example, clicking on the heading Brand
will order all the records into ascending brand number order.
- You can achieve the same thing by selecting from the Order drop-down box when
using a filter
Deleting a record (row)
- To delete a record in a grid, single left mouse click on the record that you wish to
remove
- Press the "Delete" key on your keyboard while holding down the
"Ctrl" key
- The program will prompt you for confirmation since this action cannot be reversed and
the record is permanently deleted
Re-Sizing Grid Column Width
- To alter a column width, move your mouse pointer over the right-hand edge of the column
heading that you wish to re-size. The pointer will change to double black arrow (see
below). Now hold down down the left mouse button and drag to resize the column width.
Once you have sized you can save your grid layout by right-clicking on
the grid and selecting Grid > Save Layout.
Ordering records (rows) in the Batch Data Entry Windows
- The program contains several windows which display animal records in a grid for the
purpose of entering information in a batch. Some examples of these are:
Animal Sales - accessed from the Data Entry | Sales menu
Bullings Batch - accessed from the Data Entry | Cows menu
Service Batch - accessed from the Data Entry | Cows menu
PD Results Batch - accessed from the Data Entry | Cows menu
- You can order the records in these windows into ascending or descending order by
clicking the column heading. Single click the heading once to order ascending (the
column heading changes to yellow). Single clicking the heading again will order
descending (the column heading changes to blue)
Printing and Exporting Grids
A right-mouse click on a grid will display a pop-up menu. Moving your mouse pointer
over the item called Grid will reveal a further menu. The options here are:
| Preview |
this option allows you to preview the grid before printing. It is a
good idea to drag all the columns of interest to the left hand side of the grid window.
This should ensure that they will print out in printer portrait view |
| Print |
sends the grid to the default printer installed on the computer |
| Export |
this option exports the whole grid contents to a comma separated value
file, which can be opened in a spread-sheet program |
Return to Top
A short cut menu gives you a list of actions or options that are relevant to the window
that you are currently working with. The program makes use of short cut menus in
most of the windows. Shortcut menus can be accessed by either clicking on the Menu button
on the toolbar
or by right-clicking anywhere within the current window. Here is an example using
the Animal Details window:
- Open the Animal Details window clicking the Data Entry | Animal Details
menu item
- Click the shortcut menu button
 on the toolbar or single-right
click within the Animal Details window
on the toolbar or single-right
click within the Animal Details window
- The shortcut menu associated with the Animal Details window now displays (shown below)
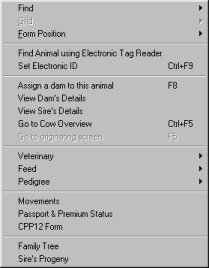
The options that can be selected from the menu relate to the animal that
is currently displayed in the Animal Details window. For instance, you may
wish to review or amend the pedigree information of the animal. Select Pedigree
| Pedigree Classifications from the shortcut menu. The Pedigree Classifications
window will then display with the pedigree details.
There are some short-cut menu items to make the speed of navigating the
program windows more efficient:
In the Cow Overview window, there is a short-cut item to "Go to
Animal Details"; this option will take you directly to the details of the brand
number currently displaying in the Cow Overview window.
In Animal Details there is an option to go to Cow Overview for the
current animal (where the type is Cow and Status is Alive)
When you use one of the above options, there is a short-cut item to
"Go to originating screen"; this will return you to the window that you
navigated from
Form Position; if you have dragged a window to a preferred position and
size, you can Save that position. Moving you mouse pointer over the "Form
Position" menu item reveals a sub-menu with the options: Save, Restore and Re-instate
default
The Animal Details window has a short-cut menu item to "Default to
Grid view when opening form"
Cow Overview has a short-cut item to Recalculate Lactation (totals)
Return to Top