
|

|
Entering Animal
Details/Recording Purchases
|
Overview
This tutorial will show you the easiest way to enter new animal details into the
program. The task uses the Animal Details window. Some drop-down
boxes e.g. Group require setting up via the Setup program menu; click the Setup
menu item you require and then press F1 on the keyboard to get more help.
Follow the instructions in the order that they appear.
To enter new animal details:
- Click on the Data Entry Helper button and then on the button for recording
purchases (or use the Data Entry | Animal Details menu item at the top of the screen).
- The Animal Details Window displays (shown below). This window is used for
entering and amending animal details.
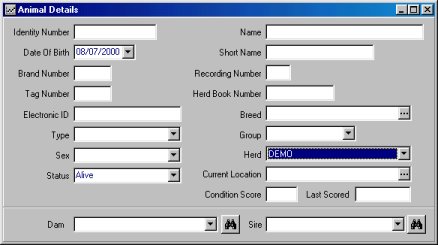
- Move your mouse pointer to the Toolbar and click the Add New Record button (it
looks like a blank sheet of paper) to set the Window ready to input the new animal details
- Type in the new animal's Identity Number
- Click the arrow on the Date of Birth drop-down box and use the calendar to
select the required date (Tip: you can move through the months using the scroll arrows at
the top of the calendar
- Use the Sex drop-down box to select the sex of the animal
- Use the Type drop-down box to select the animal's type
- Use the Status drop-down box to select the animal's status. For AI Bulls the
status should be set to Dead and the "Active" box ticked if you are currently
using the bull.
- Use the Herd drop-down box to select the herd
- The rest of the data boxes can be optionally completed
- Click the Save Record button
 on the toolbar
- The program will ask whether you have purchased the animal. If the answer is No
the program will accept the new animal details
- If the answer is Yes to the above question, the Purchase Details
Window will display. Please note that the window will look slightly different
depending on whether the animal is male or female (see below):
- When the animal Type is "Cow", the window will require you to
enter lactation details and select whether the cow is in milk or dry(see below). Please
note that when a cow is in-milk, entering its lactation details are important for the milk
recording process. Select the Premises from where the animal was purchased, its
destination location and the purchase date.
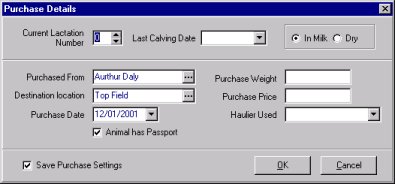
Cow Purchase Details window
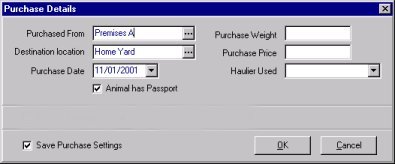
Male Animal Purchase Details window
- Select the Premises from where the animal has been purchased using the Purchased
From drop-down box (Note: you should have previously set up some Premises via the Setup
menu). If the animal stayed at the purchase premises after purchase, you can clear
the Destination premises by pressing the backspace key; this will indicate that no
movement took place.
- Select the destination Location
from the drop-down box
- Select or type in the Purchase Date. With regard to financial
calculations, the Purchase Date allows you to record the actual date of purchase,
which may not be the same as the date of movement from the place of purchase.
- You can optionally enter the Weight, Price and the Haulier used (Note: you should have
previously set up some Hauliers via the Setup menu)
- Complete the other relevant tick boxes for passport status. (Tip: if you have
purchased several animals at the same time and same place, click on the Save Purchase
Settings tick box - this will save you time when entering the details of the next
animal)
- Click OK to close the Purchase Details window
- Close the Animal Details window. If any of your changes are not saved,
the program will prompt you to save them before closing the Window