Premises Locations and Land Links |
When you first start using the Orchid software, some of the items listed below must be set up before they can be used for data entry; they are found under the Setup menu. Tip: When you click on a set-up item, you can get more help by pressing the F1 key. Setting up Premises is important for recording BCMS movements.
For examples and further discussion on the concept of premises and locations Click Here
The program maintains the movement book for all animals in the system. For this to work correctly, you need to enter the details of your own premises and other premises that you deal with. In the Orchid program, premises are the individual holdings registered with BCMS. Markets, abattoirs and farms that you deal with must each be input as separate Premises.
The Premises set up window contains two tabs:
|
This is where you enter the Holding and Personal details for each registered holding that you move animals between. You also specify whether you are responsible for To and From movements | ||
|
|
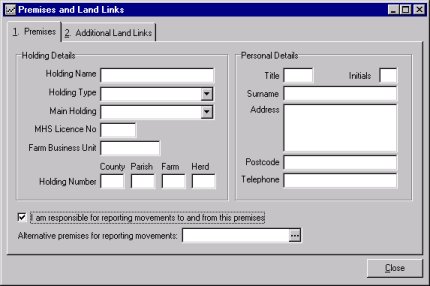
Ensure the Premises tab is showing in the window. The data entry
boxes are:
Holding Details:
Main Holding. Where a holding is part of a group of holdings, you must select the
parent holding. For instance some farms have multiple herds that are registered to
different holdings but have a main office where mail etc is normally directed as the
records are kept there.
MHS Licence Number, Type and Farm Business Unit. These details are only
required if you wish to E-mail your animal movements to BCMS.
Holding Number. The County should be two digits, Parish three, Holding four, and
Herd two
Personal Details:
Title, Initials and Surname. Enter the details of the registered keeper of the
animals.
Holding Name. This must be entered as it is used in the Premises
drop-down boxes when you buy and sell animals. If you are unsure what the Holding name is,
you should be enter the business trading name.
Address, Post Code and Telephone Number. Enter the details of the registered
holding. This is used in certain reports including the movement book report.
In some farming situations, the need may arise to create BCMS movement records for an external premises i.e. premises where the user chooses to take responsibility for the movements but there is no Herd that is assigned to the particular premises. To set this up, find the required premises that you are managing and place a tick in the box which states "I am responsible for reporting movements to and from this premises". Therefore now in the BCMS Link Wizard, you will see movements coming up for that external premises (OFF and ON). To help explain this further, consider the diagram below:
You are going to take responsibility for reporting the movements for Farm B. In the Setup | Premises window find the record for Farm B and tick the "I am responsible..." box. Save the record. Now, for example, when animals move from Farm A (your premises) to Farm B, you will see the OFF movement and an ON movement in the BCMS Wizard.
Suppose that an official BCMS Land Link exists between Farm A and Farm B (denoted by the red line). A group of animals initially moves from Farm A to Farm B. The animals subsequently move from Farm B to the Market. Normally this movement will be reported as from Farm B. Since A and B are land-linked, you may wish to report the move to market as from Farm A. To do this, simply select Farm A from the drop-down box which says "Alternative premises for reporting movements". The movement from Farm B to market will now be reported from Farm A in the BCMS Wizard.
Save your input by clicking the Save button ![]()
Click on the Additional Land Links tab in the Premises window (shown below)

Under the heading Holding 1, click on the new blank line so
that the select button ![]() appears. Click on this button to select the name of the
Primary holding.
appears. Click on this button to select the name of the
Primary holding.
Under the heading Holding 2, follow the same procedure in step 2 above to select the linked holding
You can optionally type in notes about the new link
Save your work by clicking on the Save button
Links can be removed by clicking in the required line and then clicking the Remove link button
NOTE: Locations are an optional feature within the program - if you are an existing User, you can carry on using Premises only to record movements
A registered holding is something defined by the Ministry - it exists for the purposes of official paperwork. A location is something physical - a field or a building that is sited within a registered holding.
A location can only exist within a premises/registered holding; for example you could define the locations "Bottom Yard" and "Top Field" which are sited on the main farm holding. You must assign each location that you set up to a premises. For example, "Bottom Yard" should be assigned to the main farm holding. When this is done, the proper movement records for BCMS will be generated when you move animals from "Bottom Yard" to a livestock market (a different premises).
Setting up and using Locations in the program will allow you to precisely record and track where animals are kept throughout ownership. This is a very useful feature, since future Ministry animal health regulations could require you to produce records tracking animal movements that are not necessarily between registered holdings (as for the BCMS).
Animals can be moved to other premises for grazing etc., but remain under the same ownership i.e Herd (each herd is attached to a Premises via the Setup | Herds menu. For example, a bull could be hired out to another premises
In the Defined Locations window, ensure you have a new blank line in the grid. You can create a new line by pressing the down arrow on your keyboard
Type in the Location Name and Address
Now select the Premises the new location is linked to by clicking the
button ![]() to the right of the text line
to the right of the text line
Save your data input by clicking the Save button
Click on Setup | Locations menu item. The Defined Locations window displays (shown below)
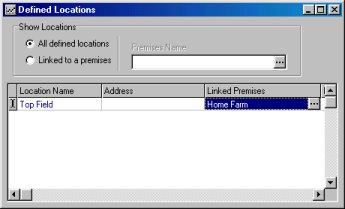
The Show Locations section of the window contains options for displaying all the defined locations or only those that are associated with one particular premises.
To display locations associated with one premises, select this option via the radio-button; notice that the Premises Name drop-down box becomes active.
Now click on the ![]() button to select the required
premises; the locations will be displayed in the grid
button to select the required
premises; the locations will be displayed in the grid
Before you start using Locations, the following points need to be remembered:
To move a batch on Animals proceed as follows.
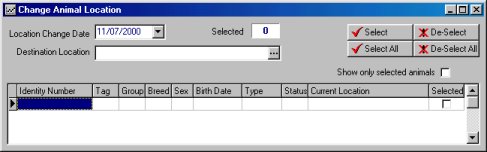
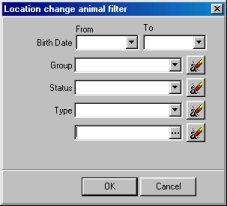
If you wish, you can use the Location Change Animal Filter
button ![]() to narrow down the list of animals that is displayed in the table grid (shown
below) with their current locations. Make your filter selection and click OK
to narrow down the list of animals that is displayed in the table grid (shown
below) with their current locations. Make your filter selection and click OK
In the Change Animal Location window select the Destination Location from the drop-down box
Use the selection buttons to select the required animals, or you can click the tick box on each line. The "selected" counter at the top of the window displays how many animals you have selected
Click the Apply Batch ![]() button to apply your changes to the data. If the destination location
is on another Premises then the program will inform you that the movement is notifiable to
the BCMS and ask you whether you wish to mark the animal as sold. Select Yes
or No as appropriate.
button to apply your changes to the data. If the destination location
is on another Premises then the program will inform you that the movement is notifiable to
the BCMS and ask you whether you wish to mark the animal as sold. Select Yes
or No as appropriate.
You can trace an animal's movements within or between holdings via the Movement Details window. You can access this window by doing the following:
Bring up the animal's record in the Data Entry | Animal Details window
Select Movements from the short-cut menu ![]() (or right-click on the Animal Details window). The Movement
Details window displays (see below)
(or right-click on the Animal Details window). The Movement
Details window displays (see below)
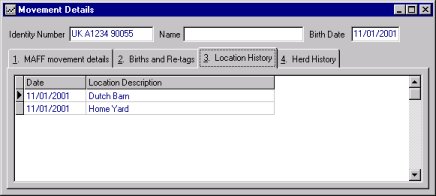
Click the Location History tab. You will see that when an animal changes location, two records are created for the movement date; one showing where the animal moved from and the other showing where it moved to. In the example below, the Locations tab is showing that the animal moved from Home Yard location to Dutch Barn location on 11/01/2001. Tip: you can print this grid out by right-clicking on it and selecting Preview or Print
|
|