
|

|
Entering Calving Details
|
Overview
"Calving a cow" within the Herd Management program involves entering data for
both the cow and calf. By default, the program checks that the calf Identity Number
conforms to the new all numeric format . This tutorial will outline the correct way
to enter calving details. Some drop-down boxes require setting up via the Setup
| Program Settings menu; the Calving Settings tab in the Program Settings
window contains several options; default groups for cow and calves, and cow event checks.
A default herd code for new calves born into the current herd can also be specified - this
will usually be the "UK" 6 digit herd code; once this is filled in, it will
appear in the calf Identity Number field.
Follow the instructions in the order that they appear.
To enter calving details:
- Move your mouse pointer to the left-hand side of the screen and single left-click on the
Data Entry Helper button. The main portion of the screen will change to
show a list of program tasks
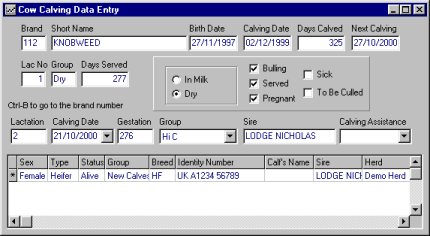
- Click on the button for recording calving details. The Cow Calving Data Entry
Window will now display (shown below). This window can also be accessed from the Data
Entry | Cows | Calving menu.
- If necessary, bring up the record of the cow that has calved by typing the Brand Number
into the Brand box at the top left corner of the Window and then pressing Enter
on the keyboard. If the cow has not been dried off, the program will first prompt
you to do so using the Data Entry | Cows | Drying Off window.
- Click the arrow on the Calving Date drop-down box and use the calendar to
select the calving date (Tip: you can move through the months using the scroll arrows at
the top of the calendar).
- Move your mouse-pointer to the lower portion of the Window and in the new blank line,
double click the Sex data box to select the sex of the calf
- Double-click the Type box to select the animal type. (Tip: if the calf is
female and is intended as a dairy replacement, you should select Type as heifer
now so it does not have changed later on)
- Double-click the Status box to select the calf status ("alive",
"dead" or "sold").
- Double-click the Breed box to select the calf breed
- Type in the calf's Identity Number. Take care to get this right,
otherwise it will be rejected by the program. Where a calf is born dead, you must
enter the ID using the special Identity Number format; you must type in the word DEAD
followed by a number from 1 to 99999 (no spaces). For example, DEAD12. Note:
you can specify a default herd code and 5 digit auto-increment number in the Setup |
Program Settings | Calving Settings | Auto-number generators page.
- Where the calf is to be moved to another herd, double-click the Herd box to
select the new herd
- Click the Save record button
 on the Toolbar
- The program will ask whether this was a multiple birth; if you answer Yes, another row
in the grid will be created for you to complete
- The program will ask whether you want to print a passport application at this time.
If you wish to apply for the passport through the postal system, click Yes
to preview/print the application notice. NOTE: If you have previously setup and gone
"live" with the Orchid CTS Wizard, answer No - this
will ensure that the calf comes up on the Wizard passport application list (please refer
to the tutorial on Using the Orchid CTS Wizard).
When the calf passport arrives on the farm from the BCMS, you should click on the
Data Entry > Passports & Historical Premiums > "Passport applied for but
not yet received" menu and mark off each animal with the received date. This
will ensure any future movements will come up for notification on the CTS Wizard.