
|

|
Entering Bulling Records
|
Overview
The Herd Management program allows you to record bullings separately to service events.
This can be useful for management purposes; for example, you can identify any cows
that are not cycling normally. This tutorial will show you the easiest way to record
a bulling event. Follow the instructions in the order that they appear.
To enter one or more bulling records:
- Click on the Data Entry Helper button and then on the button for recording
purchases (or use the Data Entry | Animal Details menu item at the top of the screen).
- Move your mouse pointer to the left-hand side of the screen and single left-click on the
Data Entry Helper button. The main portion of the screen will change to
show a list of program tasks
- Click on the button for entering bulling information. You are now presented with
two further buttons
- Click on the button for entering bulling information in a batch. The Bulling
Batch Data Entry Window will now display (shown below). You can also access
this window from the Data Entry | Cows | Bulling Batch menu item.
- Click the arrow on the Bulling Date drop-down box and use the calendar to
select the required date (Tip: you can move through the months using the scroll arrows at
the top of the calendar). Since you are only recording an observed oestrus, the date
is the only information required
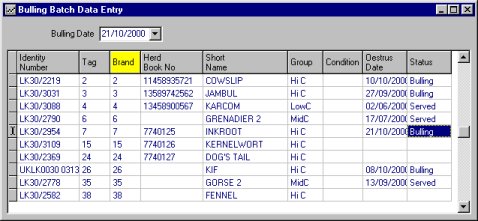
- It is easier to find the required animals if they are sorted into ascending Brand Number
order. To do this, click on the column heading Brand. Notice how the
heading changes colour to yellow when the data is sorted into ascending order
- Identify the row for each animal that you want to record as bulling and double-click on
its Brand number. Notice that the Oestrus Date is amended and the Status
changes to "Bulling"
- Click the Apply Batch
 button on the Toolbar
- Close the Window. If any of your changes are not saved, the program will prompt
you to save them
 before
closing the Window
before
closing the Window