Restoring Data from an E-mail Attachment |
Data is usually restored to the program from a floppy disk. When you use the On-line Support function (Help | On-line Support), your corrected data will be returned to you as "zip" file attached to an e-mail message. It is recommended that you save the attached file to a floppy disk before running the restore process; in this way you will have an extra back up of your data. This tutorial will first explain how to save the attachment to a floppy disk and then go on to describe the Restore procedure. The illustrations used here are from Microsoft Outlook Express 5, which is supplied with the 1-Stop installation CD.
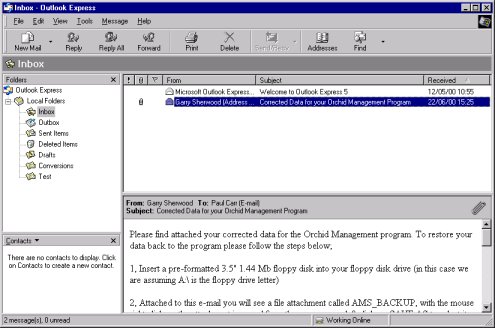
Figure 1
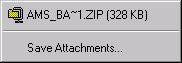
Figure 2
Outlook Express will now ask what you would like to do with the attached file. Click on the option to Save it to disk (Figure 3)
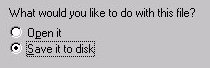
Figure 3
The Save Attachment As window will now display (Figure 4). From the Save in: drop-down box, select Floppy (A:)
In the File name: drop-down box type the following filename:
AMS_BACKUP.ZIP
Click the Save button. The zip file containing your data will now be saved to the floppy disk. This may take a few seconds
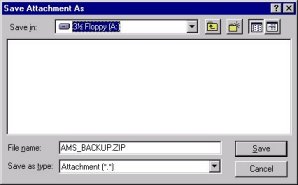
Figure 4
In this case, you will need to save the attachment to your hard disk (C: drive). To do this, you will need to specify a location on the C: drive (Step 4 above) instead of the A: drive. You would then restore the data to the program from this hard disk location.
Microsoft Outlook is part of the "Microsoft Office" suite of programs
Insert a blank floppy disk into the A: drive. It is a good idea to label the disk with the date of the backup
Open the e-mail that contains the data file attachment. The latter will be represented by the icon shown in Figure 5
![]()
Figure 5
Right click on the zip file icon. A pop-up menu will appear. Click on Save As. The the Save Attachment window will now display
From the Save in: drop-down box select Floppy (A:)
In the File name: drop-down box ensure the following filename
is entered:
AMS_BACKUP.ZIP
Click the Save button. The zip file containing your data will now be saved to the floppy disk. This may take up to 30 seconds or more
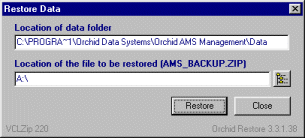
Once the file has been written to the
disk, go to Start | Programs | Herd Management | Restore Data. The
restore program should prompt you to insert a backup disk in the floppy drive A, but this
should already be in place. If the A:\ drive is not showing, click the ![]() button to select
the A: drive. Click on OK for that warning and the Restore
Database program will run. You should not need to change any of the options.
Now click the Restore button to start the restore process.
button to select
the A: drive. Click on OK for that warning and the Restore
Database program will run. You should not need to change any of the options.
Now click the Restore button to start the restore process.
When the Restore is complete, close all programs and then start the Herd Management program. You will find your corrected data restored to the program.
|
|