
|

|
Performing a 1-Stop Auto
Parlour Recording
|
Overview
This tutorial provides supplementary guidance for performing a milk recording direct
from an electronic parlour. The key to a successful milk recording is
preparation. If you have kept your records up-to-date within the program, the milk
recording process will be straightforward. Data entry should closely follow events
for each cow, i.e. Calving - Bulling/Service - PD - Drying Off. If you have
purchased or sold any cows in-milk, make sure you have entered this data. Please
refer to the other tutorials in this series
for help on completing these data entry tasks.
The parlour link needs to be setup correctly via the Setup | Milk Recording window.
It is best to telephone Orchid Support for advice on setting up your specific
parlour. You will need to identify the folder on your computer where the special link file
is stored. This file is specific for a parlour manufacturer and handles the
communication between the 1-Stop program and the parlour software.
Important Points to Remember for Milk Recording
- Make sure your cow records are up-to-date within the program
- Back up all computers (parlour, office) before starting a recording
- Do not access the electronic parlour software while milking is in progress
- Destroy the previous recording sheet and pot labels in the event of having to restart a
recording. This is done because the cow brand numbers could be in a different order
when restarting, and consequently the sequence number would be different to that shown on
the previous recording sheet.
Factored Milk Recording
If you wish to perform a factored milk recording go into Setup > Milk Recording and
click the 1-Stop tab. The check box for “Factored” needs to be
ticked. The “Number of times cows milked per day” should be set to 2
(please note in the case of deLaval Alpro, ATL and Davlec parlours the times per day
should be set to 1 as these parlour types only output a single 24 hour yield value).
Data Transfer between a Parlour Computer and an Office Computer
Where two computers are running the Herd Management program, it is very important to
maintain the herd data on both machines in an identical state (synchronised) so that the
integrity of the data is always guaranteed. This requires a strict data management system.
In most situations there will be one computer in the parlour and one in the home
office (the latter probably with the internet connection).
There are two options for a data management system:
- Backing up the data to a portable storage medium e.g. floppy disk(s) or larger capacity
"Zip" disk and restoring it to the other computer
- In some situations it may be viable to consider setting up a network connection so that
one set of Herd Management data can be shared between the two computers. This
eliminates the requirement to physically transfer data on disk between the machines.
Data integrity is thus more easily maintained
For more information read the tutorial for maintaining data on two computers
The Milk Recording Process
The order of the individual tasks given in the 1-Stop Milk Recording
window is controlled by the software and cannot be altered by the user; when each task is
completed, it will move from the To Do to the Done list in the window.
First, open the Perform Milk Recording window from the 1-Stop
Milk Recording screen. This contains the list of recording tasks.
Each task has a button next to it.
- Click the first button to Check recent events have been entered. This
opens a window that will allow you to check that your herd records are up-to-date.
If not, enter the data into the program. If you are confident your records are
correct, click OK. Notice how this task now moves to the Done list
- The second step is Connect to parlour and create milk recording sheets.
This is where the list of cows will be retrieved from the electronic parlour via your
parlour link. A sequence number for each cow brand number is allocated
- The third task is to Print the recording sheet, which contains the sequence
numbers and brand numbers for the cows. Make sure your printer is ready
- The fourth task is to Print the sample pot labels
At this point in the procedure, it is time to do the milkings for
the recording
- The milkings for the recording should now be finished. The fifth task is to extract
the milk yields from the parlour. The yield data will be extracted to the Milk
Recording Data window (see below)
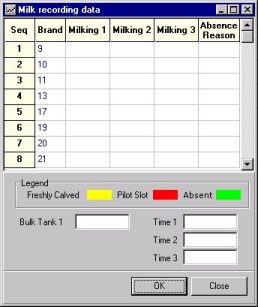
- Task six is to Enter bulk tank totals and mark cows absent. To mark cows
absent, click in the Absence Reason drop-down box for each cow, and select an
absence reason from the list; notice how the cow's record changes to the green
"Absent" colour. Once you have entered all the data, click the OK button to
close the window and proceed to the next step.
If your parlour machine does not have the means of connecting to the internet, you
need to pause now and complete the recording on a computer that does have an internet
connection. You need to ensure that this computer has the same data as the parlour
machine. This means following one of the following methods:
- Back up the data from the parlour machine and restore it to the computer that has the
internet connection.
- Where you have a network connection set up, you simply move to the machine that can log
on to the internet in order to finalise the recording.
(Note for Factored recordings:
The preferred
approach for an auto-parlour factored recording is to extract the 24 hour yield. When the yields have been extracted, the next step
is to mark off any absent cows. Next enter the bulk tank
total(s) and then the milking Times. For
morning collections, the interval between the milkings must be between 720 and 870
minutes. For afternoon collections, the
interval between the milkings must be between 570 and 720 minutes. When
the data entry is complete, click the OK button. The
program will ask if the sampling time is PM. If
this is the first Factored recording, the program will next prompt for the previous
sampling time (either an AM or PM time according to your previous response). The program will prompt whether the bulk tank was
empty prior to commencing the recording. Finally
the user will be prompted to confirm whether the cow yields are 24 hours yields. In the case of an auto-parlour recording, it is
preferable that the 24 hour yields are extracted, so answer Yes. A window will display showing that the data has
been validated, ready to Finalise the recording (transmit the data to the HUK/CIS database
via the Internet).
- The final stage is to Finalise the Milk Recording. This is where you
connect and transfer your recording data to Holstein UK. You are first prompted to
input your milk recording prices, as shown below:
- Once you have done this and clicked OK, the Login Details window will
display. Confirm your Herd Prefix and enter your PIN. Click OK.
Your computer will now dial up your internet service provider and connect with the
Holstein UK central computer. The login and data transfer process may take several
minutes. When the data has been transferred, the program shows a message confirming
that the operation was successfully completed.
You can view the recording details by clicking the Data Entry | Milking | Amend
Recordings menu at the top of the main program screen. The Milk
Recordings window displays. You will see the date of the recording at the top
left corner of the window. The yields have been added, but the quality results are
absent, of course. The quality results are returned to Holstein UK from the testing
lab usually after 48 hours. When you click the Update Quality Results
button (from the 1-Stop Milk Recording window), your computer will dial up again and
retrieve these results.
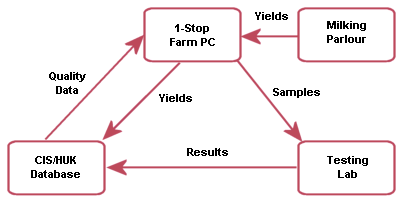
The diagram below shows the flow of data that will eventually allow you to retrieve your
milk quality data from Holstein UK. During the recording process, a Milk Recording Batch
Number is allocated, which accompanies both the samples and the yield data. In this
way, the yield and quality data will be correctly linked together; this illustrates
why you should discard the original recording sheet when you restart a recording, i.e. the
Batch Number is printed on the recording sheet.
IMPORTANT: Where you have moved to another computer to finalise the recording, and have
no network connection, don't forget to restore the data back to the parlour machine (this
is an on-going process)